Downgrading from Windows 10 to Windows 7 on a Toshiba laptop
Experience Level: Intermediate
NOTE! this post explains a time-consuming process. Always have patience when performing OS (Operative System) installations. Well, always have patience when it comes to anything regarding IT, tip of the day.
Quick Guide:
- Backup your files to an external media device.
- Make a backup, Image, of your hard drive: Start > type: Control Panel > Backup and Restore > create a system image > On a hard disk (plug in external hard drive or USB flash drive) > follow the wizard.
- Restart your computer. While booting press either [f12] key or [0] zero key (Depends on which Toshiba laptop you have) until you hear a beeping sound. The factory reset installation will start. Follow the wizard. Note entire hard drive will be wiped!
- Make a Toshiba recovery media in case hard drive would crash: Start>type: recovery > open: Recovery Media Creator > follow the wizard. Please dedicate a USB flash just for this purpose.
Background
Okay, here’s the deal: I want to download and play Settlers III ultimate collection from gog.com but the game is only compatible with Windows 7. Sadly, I don’t have a computer with Windows 7 and I really would like to play the game. I am longing for the nostalgic trip that gog.com has provided me with so many times before. So, in this post I will explain how I am going to tackle this issue.
I own two computers, two laptops, and both have Windows 10 installed. One of the laptops are more than six years old and can barely run Windows 10. This old one is a Toshiba Satellite L755-1DR and originally came with Windows 7 preinstalled. When Microsoft offered a period of free upgrade from Windows 7 to Windows 10 I jumped on the bandwagon. However nowadays I rarely use my old Toshiba and I am certainty not in need of two laptops with Windows 10. This is a no-brainer, I will downgrade the old laptop to Windows 7 and breathe new life into it. My Toshiba will be promoted from laying-in-my-closet-and-collecting-dust-computer to play-all-the-awsome-Windows7-compatible-retro-games-computer. =)
Step one: Make a backup image of the hard drive
An image is a file that contains a snapshot of the entire hard drive. It is a more technical way to make a backup, not just drag and drop your favourite pictures to an external hard drive or USB flash drive. The great benefit of creating an Image is that it is always possible to get back to that state of the hard drive when the image, backup file, was created. If something goes wrong with my reinstallation of Windows 7, I can always come back to my old windows 10 state and my computer will behave as just before.
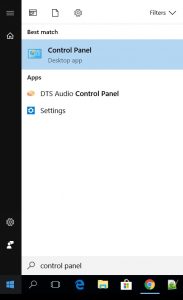
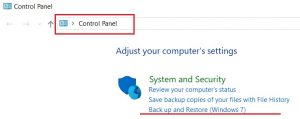
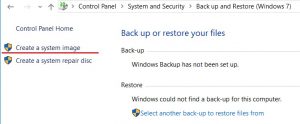
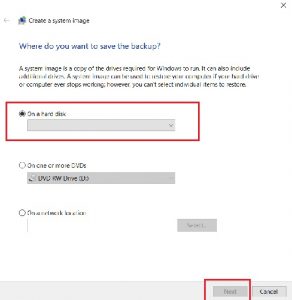
I use the Windows built in function to create an Image: Push the Start window button on the lower left corner > Type: Control Panel, open it > Backup and Restore > create a system image > On a hard drive > plug in an external hard drive to target (images can be fairly large so make sure you have enough free space) > finally just follow the wizard.
- Open the Control Panel
- Choose Back up and Restore
- Open create system Image wizard
- Choose to create an Image on an external hard drive (plug in an external hard drive)
- Finish off by following the wizard.
Step two: Get a copy of Windows 7
NOTE! You don’t need a copy of a Windows OS when you have a Toshiba laptop. Read this step to see how I learnt about it. The only thing you need to do is to press either [f12] key or [0]zero key when you restart your computer and follow the instructions from the system.
You will soon discover that this step takes another direction than originally intended.
Normally when you reinstall your computer you will need some sort of recovery media device. It could be a USB flash drive or discs with a Windows OS (e.g. win7 or win10) copy that the computer can boot and reinstall from. If you don’t have this at hand, like I didn’t, you can download it from Microsoft with your product key. Before Windows 10 the product key was normally printed on a sticker somewhere on your computer. I found my product key on a sticker under my laptop. But when I entered the product key on Microsoft’s website I got this error message:
“The product key you entered appears to be for software that was pre-installed on a device. Please contact the device manufacturer for software recovery options.”
Well, in this case Toshiba was kind enough to print the product key on the computer. It turns out that on Toshiba laptops you will perform the reinstallation of the OS in a slightly, at least for me, unconventional way. On this kind of Toshiba laptops there is a special partition (other word for space on the hard drive, kind of) on the hard drive dedicated for reinstallation. On this partition there are factory settings and OS saved in the state just like when you first bought the computer. To make the computer boot from this partition and reinstall itself you just have to press either the zero [0] key or the [f12] key, depending on the version of the laptop (mine needed the zero key). So, go ahead and restart your computer and press one of the keys until you hear a beeping sound.
Step three: Have more patience
Now, after you hear the beeping, release the key and just follow the instructions from the system and perform the reinstallation. You must name the computer again, do everything again just like it was when you bought it. And of course, the whole hard drive will be wiped to factory state when it was new.
Step four: Make a recovery media of the hard drive
We have just found out that even though a Toshiba laptop owner has the Windows product key you can’t download it from Microsoft. What do you do if the hard drive crashes and has to be replaced? Do you have to buy a new expensive copy of Windows? No, you don’t have to, but you have to do the following: Use the built in Toshiba recovery software to create a recovery media device. What this program will do is to copy the partition of the hard drive (the one used for reinstallation) to an external media. You can copy it to disks (if your laptop has DVD burner) or USB flash drive. If you choose a USB flash drive this must be dedicated for this purpose. The Toshiba recovery program will wipe the USB flash drive and you should only use it for reinstallation purpose. It is worth to mention that this copy will only work on YOUR computer. The copy is in some way linked to your computer’s motherboard. You can’t use these recovery discs or USB flash drive to reinstall a friend’s Toshiba.
To create the Toshiba backup media, follow these steps:
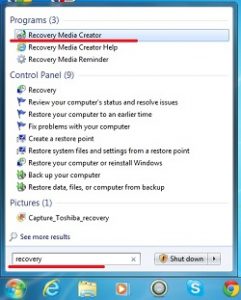
- Push Windows start button and type: recovery
- Open the program: Recovery Media Creator
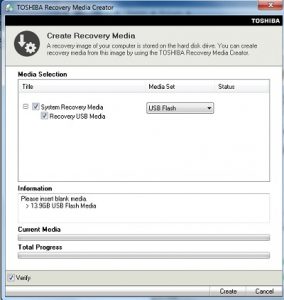
- Do the following setup, follow the instructions and create the recovery media. Be patient, it takes a while:
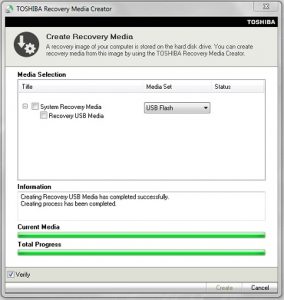
- When you see this, you can close the program and eject the USB flash drive:
Finishing off
You now have:
- A fresh Windows 7 installation.
- A USB Flash drive recovery Image of your Toshiba laptop.
Now I am ready to play some Settlers III!