NESPi Project Part 9 – Composite Video and RCA Audio
If you would like to use the NESPi with an older TV with no HDMI, this is the post for you!
Quick Guide
- Split a RCA/composite video cable.
- Solder the wires to the contacts.
- Make software configurations.
Step 1 – RCA/Composite Video Cable
You would like to get a cable like the one on the picture below. There are special made cables for the Pi, but these kinds of cables were also used for digital video cameras and are commonly found.
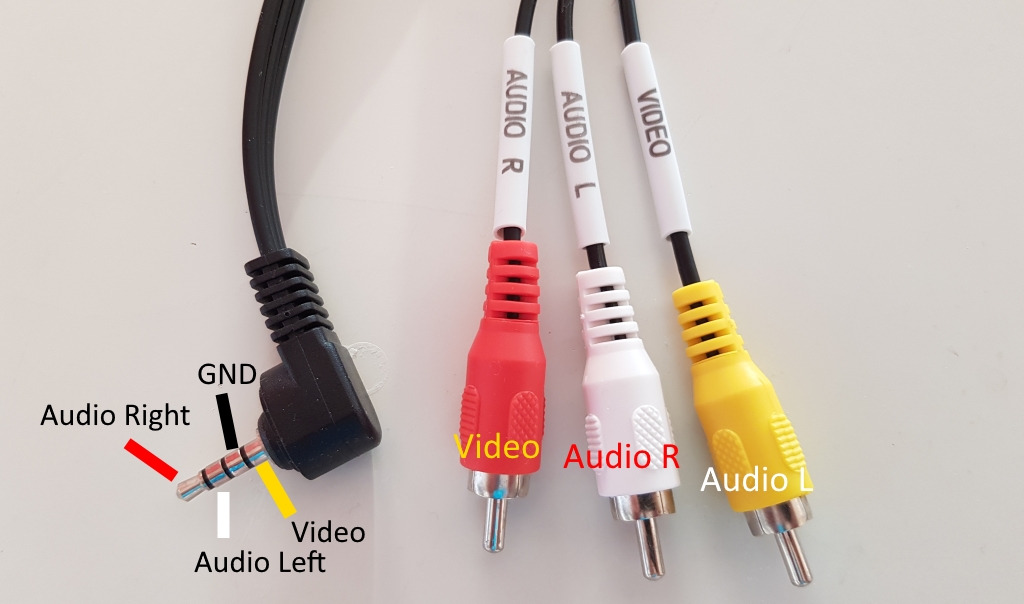
Here, I am using a cable for a digital video camera. The cable is working but note that the colour coding is swapped! For instance, the red cable for a camera’s right audio input is the corresponding video output from the Raspberry Pi.
Step 2 – Solder the Wires
Time to connect some wires:
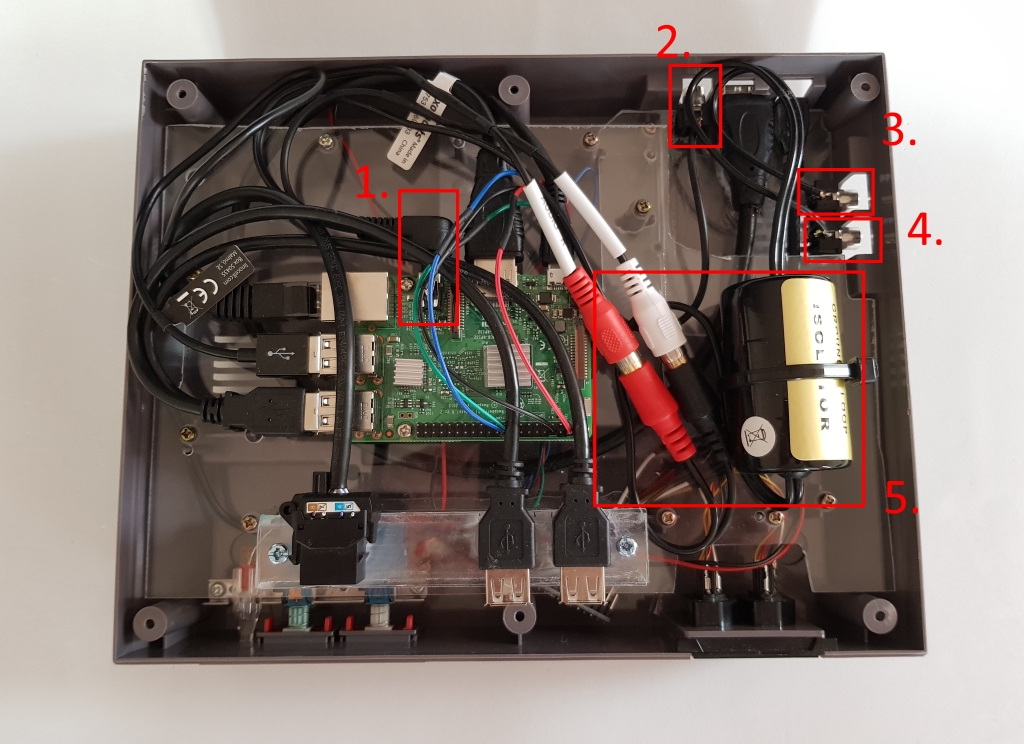
- Plug the cable into the Pi here.
- Solder the video wires here, ground up.
- Right Audio.
- Left Audio.
- Ground Loop Isolator.
Note. I added a ground loop isolator inside the NES case and run the audio wires through it. This is to remove some noise. Noise is very common between analog devices on audio e.g. between a video game console and a TV. Note, that you don’t need this, it was only a marginally better effect to add this.
Step 3 – Software Configuration
We need to make two configurations to make this work. Let’s start with the audio output.
Raspi-config – Audio
- Exit to terminal f4.
- Type: sudo raspi-config
- Choose #7 Advanced Options
- Choose A4 Audio
- 1 Force 3-5nn headphone jack
- OK
Now you have forced audio output to the RCA outputs.
Config.txt – Video
- Exit to terminal f4.
- Type: sudo nano /boot/config.txt
- Comment these lines, should look like this:
# hdmi_group=1
# hdmi_mode=16.
- Uncomment following lines, should look like this:
sdtv_mode=2
audio_pwm_mode=0 (might not be needed, depends on image)
- Save and quit.
You can read more about the config here: https://elinux.org/RPiconfig
- sdtv_mode=0 Normal NTSC
- sdtv_mode=1 Japanese version of NTSC – no pedestal
- sdtv_mode=2 Normal PAL
- sdtv_mode=3 Brazilian version of PAL – 525/60 rather than 625/50, different subcarrier
Note. I have problems with this, the line audio_pwm_mode=0 should not be needed and still with this added, the performance is not that great. I found something on a forum that the splashscreen added in retropie have configurations that conflicts with the composite video, I can’t confirm this, so it is just a wild guess.
Finishing of the Whole Project.
This is the last blogpost in this series. I have showed you everything to make your own NESPi. Don’t forget to take a copy of the SD card as backup now when we are finished everything. You can use the Win32DiskImager software we used to write to the SD card in an earlier post. This time use read and save the copy of the image to a hard drive. Over and out for now!