A Brief look at Virtualization and Virtual Machines (Windows 10 Pro)
Imagining that you only have one computer, let’s say a laptop with Windows 10 Pro. Someone told you that you should check out Linux Ubuntu Operating System (OS). Or maybe you want to play a computer game that is not compatible with Windows 10 but an older OS. Or maybe you want to test a software that can only be installed on a Windows Server OS Edition. Well, what are you going to do? Buy a new computer just to install another Operating System? To solve this issue, we can use a technique called Virtualization.
Virtualization allows you to install another OS on the same hardware as a completely different OS. It will “virtualize” your, e.g. laptop to act as another computer with other configs, software and whatever you choose to do with it. And everything you do in your virtualized computer (Virtual Machine or just VM) won’t affect the OS your laptop is running. This technique comes in handy in many situations!
TL;DR;
- Enable Hyper-V options in Windows features.
- Download an OS ISO-file.
- Create a new Virtual Machine in Hyper-V manager.
- Start, connect and install the OS on your VM.
- Enable Remote Desktop and connect again.
- Create a checkpoint.
Index
- Keywords
- Constraints
- Prerequisites
- Info about the Host (your computer)
- Enable Hyper-V
- Download OS
- Create Virtual Machine in Hyper-V Manager
- Install the OS (Windows 2016 Server) on the Virtual Machine
- Remote Desktop Connection
- Create a checkpoint
- Summary
- References
Keywords
| Virtualization | the technique that makes it possible to run different “computers” / OS: s on the same hardware. | Host | The computer that facilitates the possibility for virtualization. (The computer with the hardware for the virtualization). |
| Virtual Machine (VM) | The computer that are being virtualized on a host. |
| Hypervisor | A Virtualization software, from which you create and manage VMs. Hyper-V is an example of an Hypervisor. |
Back to Index.
Constraints
This post will only cover virtualization I Hyper-V on Windows 10. You should know that there are other Hypervisors e.g. VMware.
The reason I choose to cover Hyper-V is that it comes natively with Windows 10 Pro.
There is a lot to learn about Hyper-V manager and virtualization. This post will only cover the bare minimum, so you can get things started.
Back to Index.
Prerequisites
- Windows 10 Pro. (Windows 10 don’t have the Hyper-V feature, it must be the pro version)
Back to Index.
Info about the Host (your computer)
From now on I will call your computer the Host. The Host will be running the VM (Virtual Machine) that we will later install in Hyper-V (The Hypervisor we will be using).
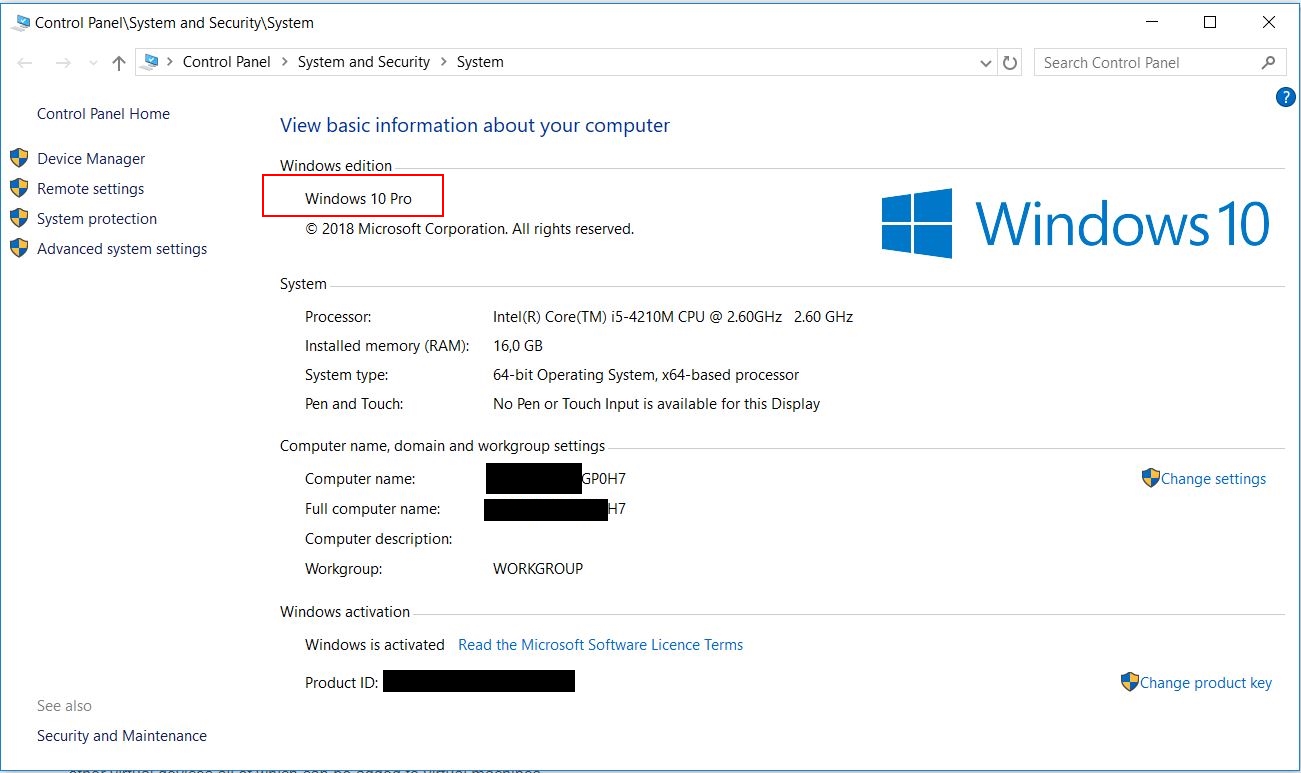
Got to: Start-> Control Panel-> System and Security-> System. To read about which OS you have installed and make note of your computer name.
Info. You can also simply right click This PC-> Properties to bring up the same window.
Back to Index.
Enable Hyper-V
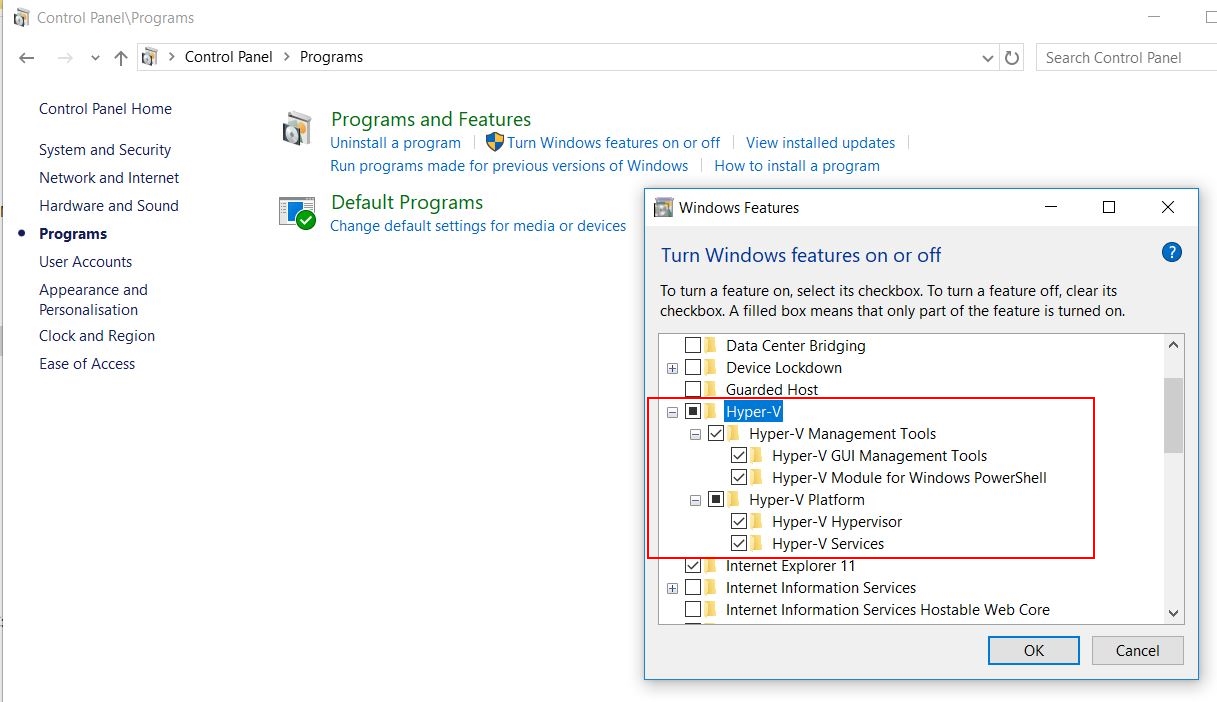
Hyper-V is the platform we will be using. Windows 10 Pro ships with it but it is not enabled by default. To enable Hyper-V got to:
Start-> Control Panel-> Programs-> Turn Windows features on or off-> check all boxes with Hyper-V:
Note! It’s rare but sometimes Hyper-V is not enabled in BIOS. You might see the following “Hyper-V cannot be installed: Virtualisation support is disabled in the firmware”:
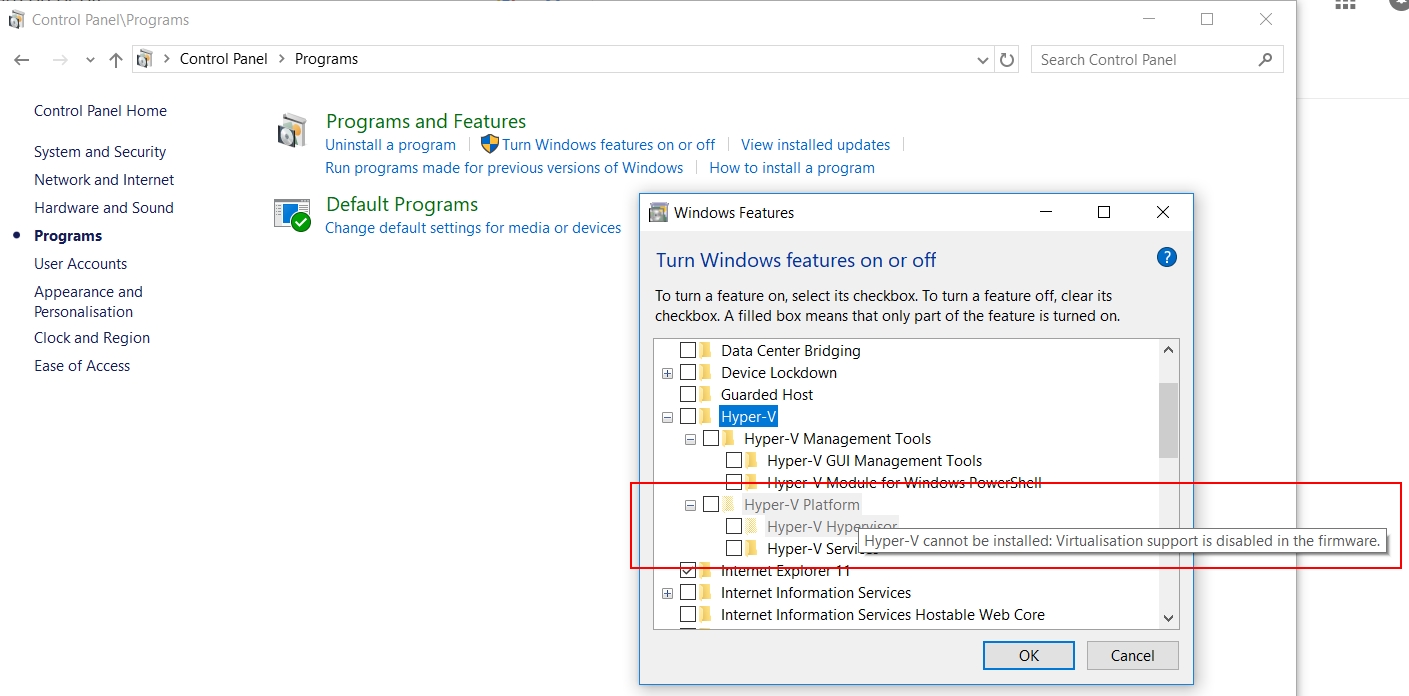
In this case, Hyper-V must be enable in BIOS (firmware). This is done differently on different PCs. This is how I did it (HP ProBook, Intel i5) and I hope it gives some pointers:
- Restart computer and on start press Esc to boot into BIOS.
- Press f10 to open BIOS setup menu.
- Use arrows for navigation. Navigate to the tab Advanced.
- Open: Device Configuration.
- Check the box next to Virtualization Technology (VTx).
- Save changes and exit.
- Restart computer and it should now be possible to enable Hyper-V as described above from Windows Features.
Restart the computer.
Back to Index.
Download OS
Before we install a VM we need an OS. I will create a VM with Windows Server 2016. To get a trail version of the OS you can go to this link and download it:
https://www.microsoft.com/en-us/evalcenter/evaluate-windows-server-2016?filetype=ISO [2019-03-01]
Save it to e.g.: C:\Users\Public\Documents\Softwares\Windows Server 2016\
(When working with VMs I like to keep files in the public folders so I can access them from the VMs, enable file share of public folder in network and sharing center)
Back to Index.
Create Virtual Machine in Hyper-V Manager
Open Hyper-V Manager: Start-> Type: Hyper-V Manager-> Enter.
This is how the GUI looks like (black; your computer name / Hostname):
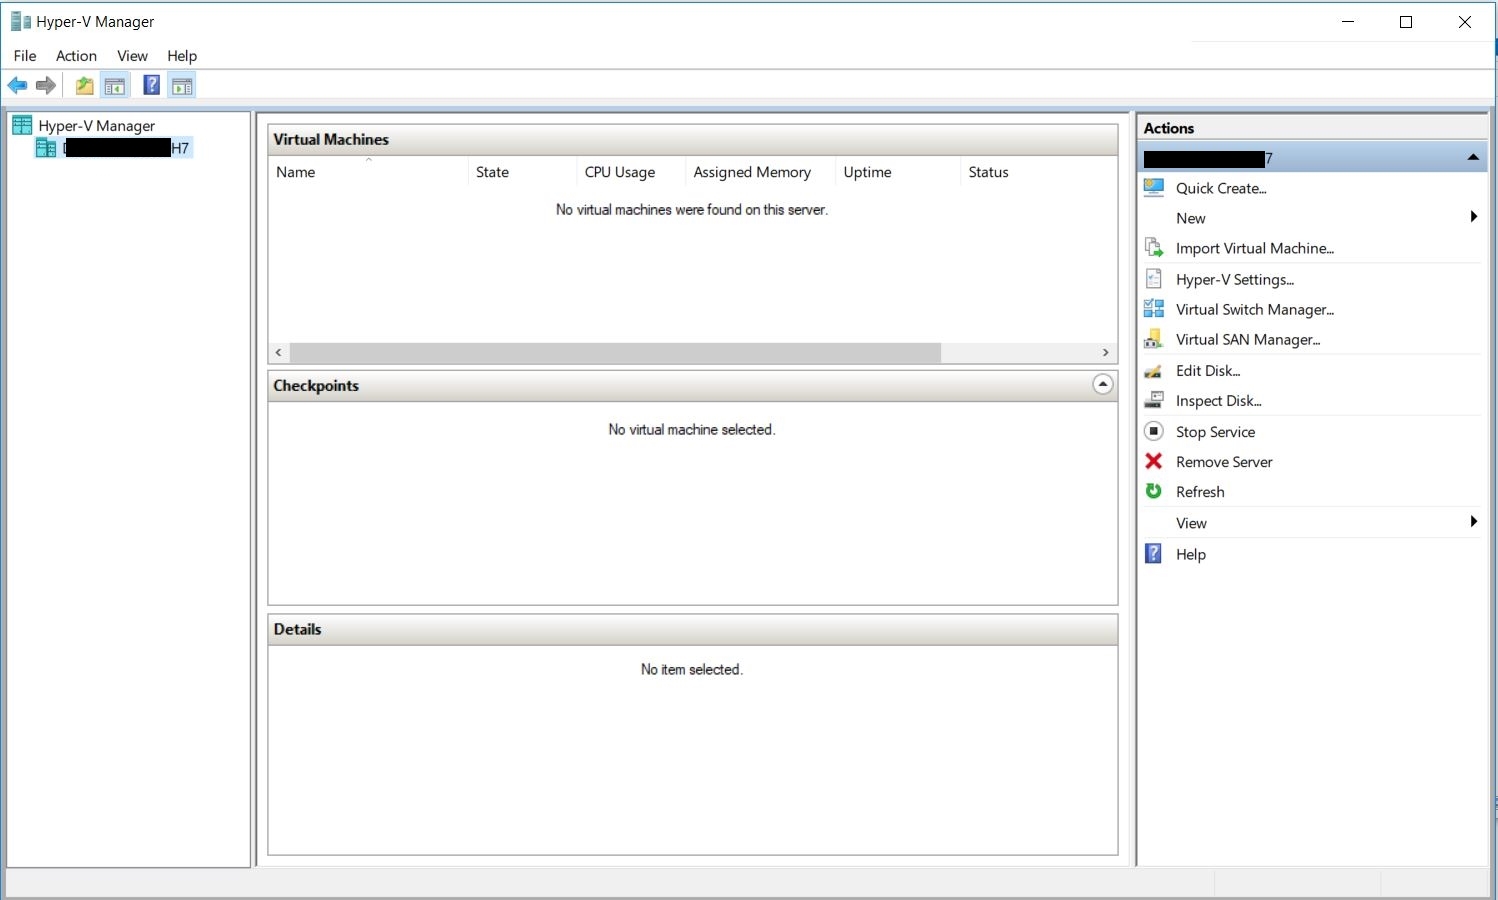
Click on your Host name-> Action-> new-> Virtual Machine. This will bring up a wizard:
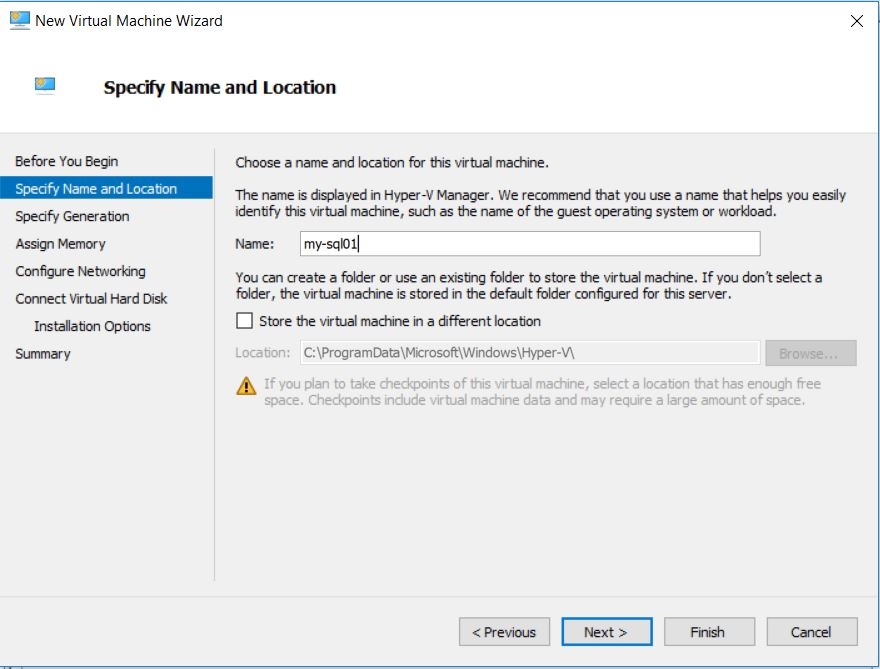
(I name my server my-sql01, because I will use it to run a SQL-server)
Table of my settings (if a setting in the wizard is not mentioned here, I just used the default setting/values):
| Specify Name and Location | Name: | my-sql01 |
| Specify Generation | Generation1 | |
| Assign Memory | Startup memory: | 2048MB |
| Use Dynamic memory | checked | |
| Configure Networking | Connection: | Default Switch |
| Connect Virtual Hard Disk | Location: | Note the path to the VM. The VM will be stored in one single file with the extension: .vhdx |
| Size: | 127GB | |
| Installation Options | Install an operating system from a bootable CD/DVD-ROM | Image file(.iso) (Browse to the OS iso-file you downloaded) |
| Finish |
Info. The Default Switch will let your VM to share network connection with your Host. Both Wifi and ethernet (wired). So, you will be able to browse the Internet from you VM.
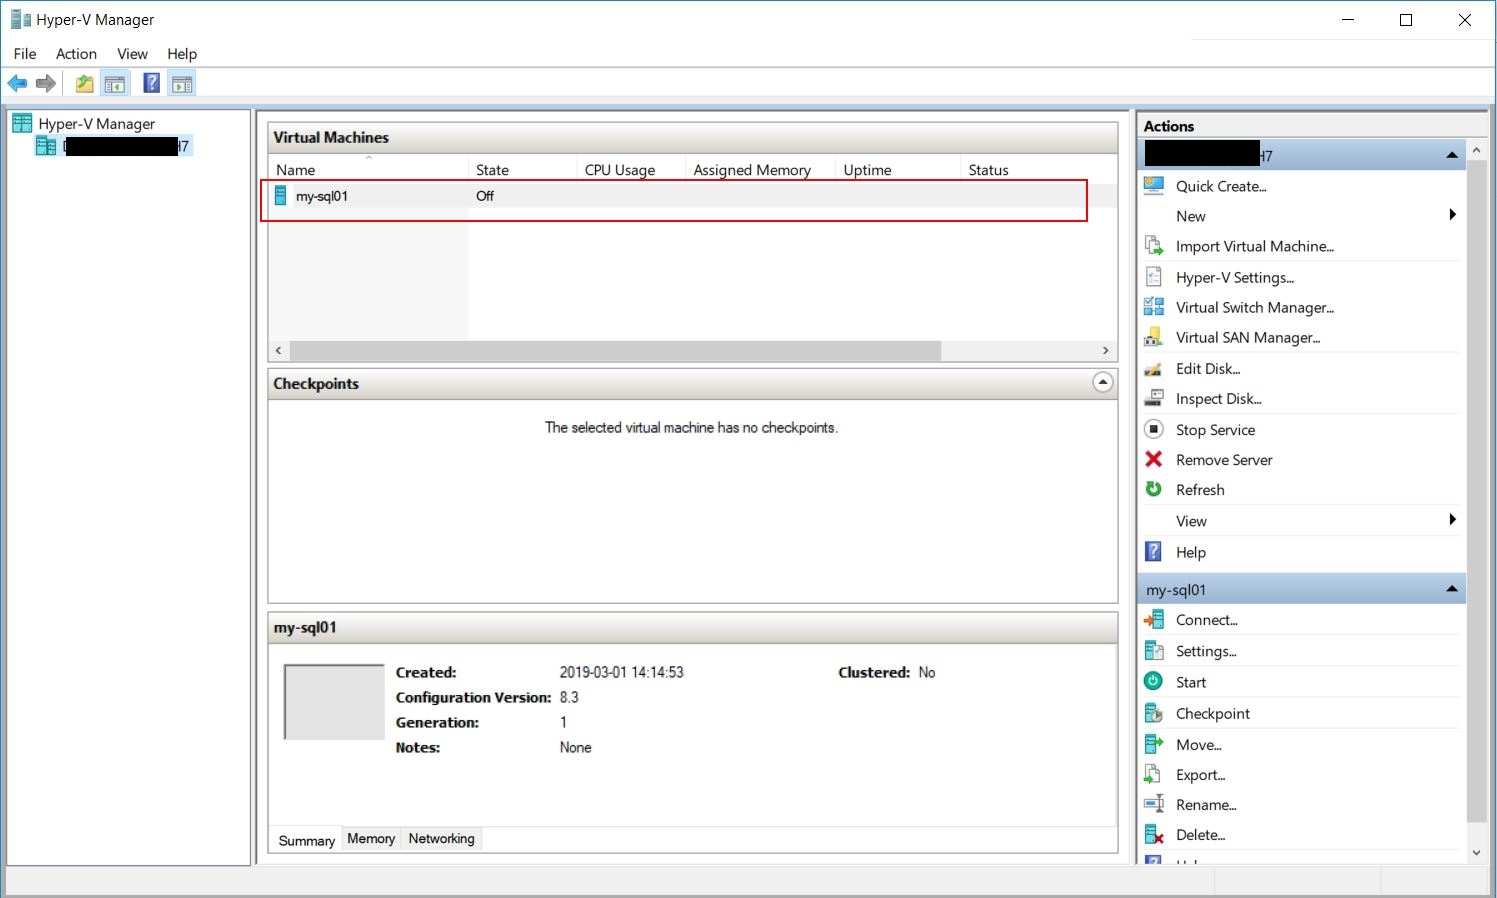
After you completed the wizard, your VM will show up in the GUI:
Back to Index.
Install the OS (Windows 2016 Server) on the Virtual Machine
This is the walkthrough for the operative system I choose to install, Windows Server 2016.
Info. You can find a post about how to install Windows Server 2016 with pictures here: https://www.raspberryfield.life/2019/03/11/install-windows-server-2016-hyper-v/ [2019-03-11]
- Right click your virtual machine in the Hyper-V Manager GUI and choose START.
- Right click again and choose connect.
- An installation wizard will open. Choose your language and time preferences.
- Install Now.
- Important, in the next window, choose Windows Server 2016 Standrad Evaluation (Desktop Experience) If you choose the default option, you will install a server without a GUI.
- Accept the license and click next.
- Choose Custom: Install Windows only then next.
- Windows will now install.
After the installation is completed.
- Reconnect to your VM.
- Choose a password for user Administrator.
- Use ctrl+alt+end to log in If you try ctrl+alt+del that command will work on your Host, not VM.
- Log in to your VM.
Back to Index.
Remote Desktop Connection
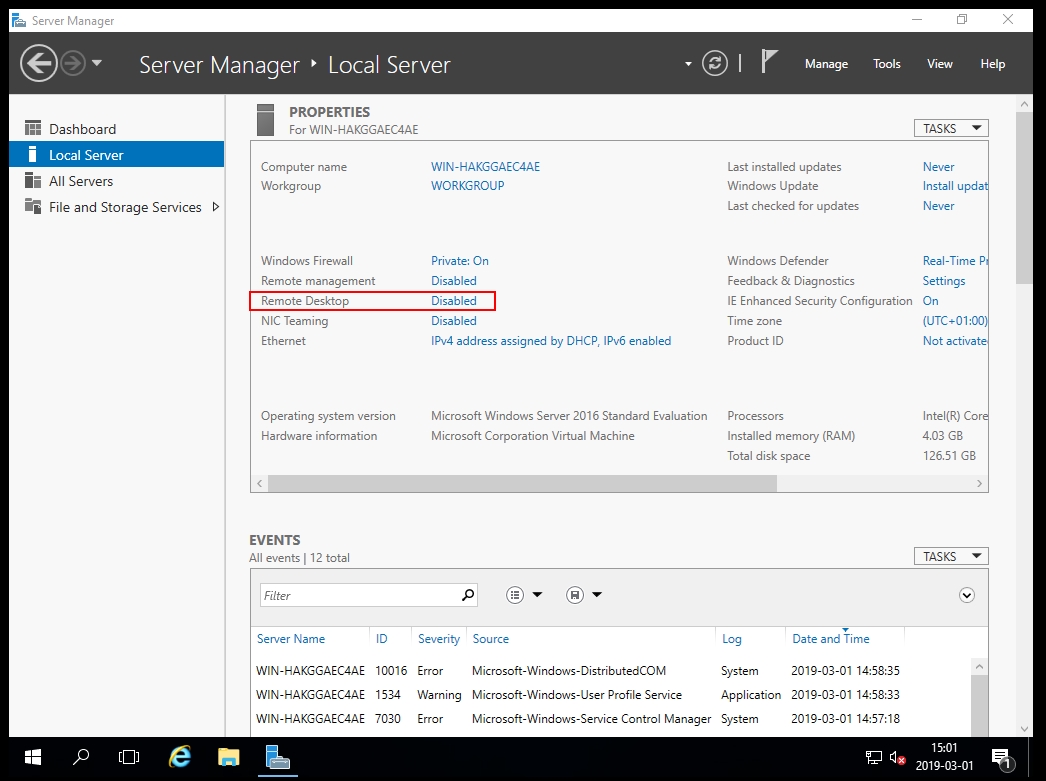
Now, when you are connected to the VM, it is via the Hyper-V Manager. I personally don’t like this default connection tool. I prefer to use an application called Remote Desktop Connection. I think it is much easier to get the screen resolutions right etc. To be able to use Remote Desktop Connection (RD or RDC) the functionality must be enabled on the VM.
On the VM, open Server Manager (it always opens when you start a Windows Server) and choose to enable remote desktop connection:
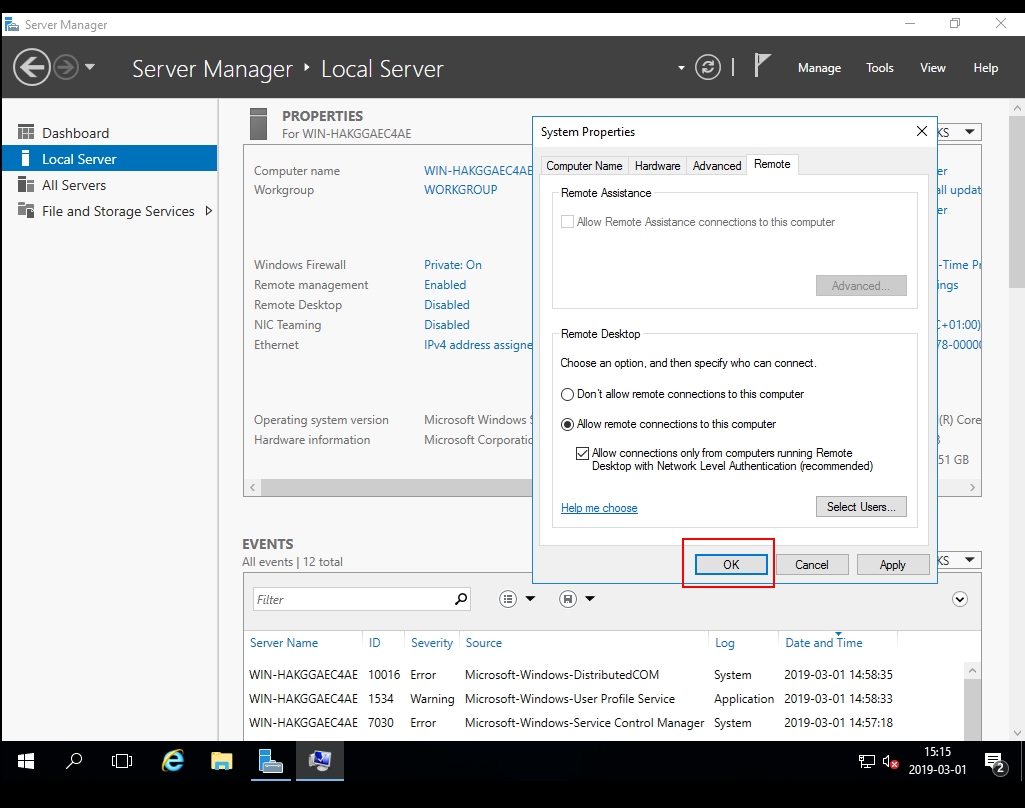
Now, choose full screen and connect again. Have patience, it might take a while to reconnect.
Once connected, you will notice that the screen fits much better to your monitor.
Back to Index.
Create a checkpoint
Go back to the Hyper-V Manager. You can right click on your virtual machine and choose checkpoint. Now, a checkpoint (snapchat) of your VM will be created. If you mess things up, you can always revert your VM to a checkpoint and start over.

Back to Index.
Summary
In this post we have familiarized us with Virtualization, virtual Machines and we have looked at one Hypervisor (Hyper-V). So, if you want to try, work or game on another OS on your computer, it is fully possible!
This is also a good practice to know some about virtual machine and be able to use remote desktop connection. Enterprises often uses a lot of virtual machines on daily basis in theirs organizations.
Back to Index.
References
Superuser.com Hyper-V Virtualisation Disabled in Firmware https://superuser.com/questions/568425/hyper-v-virtualisation-disabled-in-firmware [219-03-01]
Back to Index.