MQTT Mosquitto – Raspberry Pi
Let’s get serious about sending messages between Raspberry Pis on your home network!
Info. The code presented in this blogpost is now maintained here: https://github.com/raspberryfield/python-mqtt-examples-git.
Index
- Prerequisites
- Introduction
- Install Mosquitto
- Testing Mosquitto
- Installing MQTT Python Library – Paho
- Write a Test Publisher Client
- Write a Test Subscriber Client
- Test the Publisher Client from another Device
- Conclusion
- Resources
Prerequisites
This post will cover quiet a few topics in software development. To follow along, you should have basic understanding (beginner level) of the following:
- Working in a Linux terminal.
- Programming in Pyhton.
- Have used the data structure Dictionary in Python.
- Know what a JSON format is.
- Know about Client/Server paradigm.
Before you read this post, also make sure that you have basic understanding about:
- Publish/Subscribe Broker (Pub/Sub).
There are plenty of good tutorials out there, covering these topics!
Back to Index.
Introduction
Mosquitto is a message broker of a publish/subscribe pattern. It implements the MQTT protocol (Message Queuing Telemetry Transport protocol).
I think about a broker like the distribution board or electrical panel in my home. All the power switches in my home control something: a light bulb, socket to my TV, socket to my washing machine, etc. And not only switches, the power to all sockets in my home comes from cables via the distribution board. If an electrician needs to troubleshoot something in a home, he can do it from the distribution board. If you want to change which switch controls which socket, you can do it from the distribution board. All wires are routed there!
Imagine that you did not have a single place to monitor and routing your cables in a house. It would be a mess to troubleshoot or change any configurations! Let’s say you need to replace a fuse after a thunderstorm and all fuses are located next to each socket. It would take hours to find the right one and replace it (well, in my small apartment just a few minutes…)!
It is the same thing with exchanging messages between applications and computers. You want one place to route and monitor these messages! Just like the cables in your home.
If applications and clients need to communicate information outside themselves, they should publish and subscribe messages via a centralized software and server – the Broker!
Back to Index.
Install Mosquitto
Info. It is always good to update and upgrade your packages before you make a new installation.
To install Mosquitto on a Raspbian, execute this command:
$ sudo apt-get install mosquitto -yInfo. -y means ‘Yes’ to all prompts.

Now, install Mosquitto test clients so we can later test our broker:
$ sudo apt-get install mosquitto mosquitto-clients -y

Back to Index.
Testing Mosquitto
Note. You must perform this test on the same computer as you did the Broker installation.
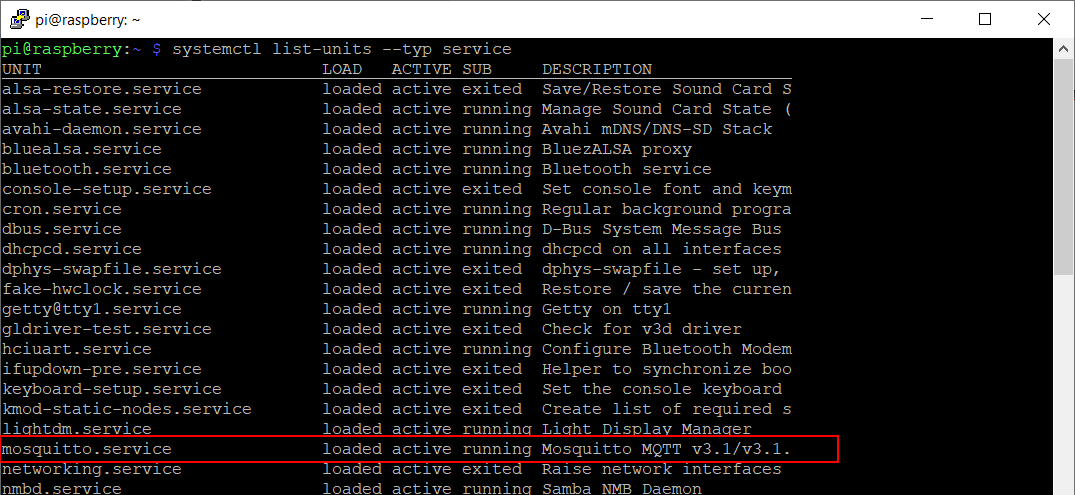
First, see that Mosquitto is installed, there should be a service named mosquitto. This command lists all services in Linux (exit with Ctrl + C):
$ systemctl list-units –type service
Look for mosquitto:
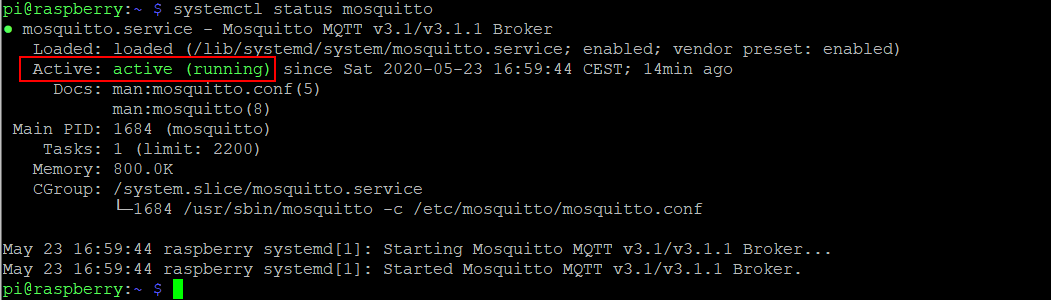
Use this command to get more information about the service:
$ systemctl status mosquitto
Info. Commands to stop, start or restart a service:
$ sudo systemctl stop <service name>
$ sudo systemctl start <service name>
$ sudo systemctl restart <service name>
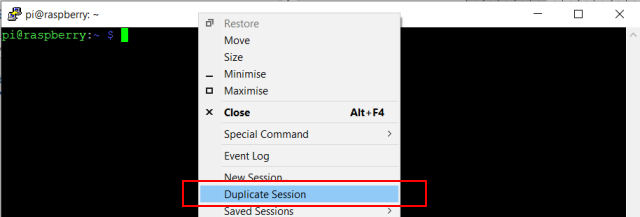
Now when we know that the program is up and running, we can use the installed test clients. To do this we need two terminal windows open at the same time! If you are using a Desktop installation of e.g. Raspbian, you just open another terminal from the GUI or with Ctrl + alt + T. If you are using ssh and PuTTY, right-click on the border of the PuTTY client and choose ‘Duplicate session’:
Now, in the first terminal, register a subscriber of the topic “my_tes_topic”:
$ mosquitto_sub -t “my_test_topic”

Info. Topic is like a queue message but it can have several consumers (subscribers).
The subscriber test client is now listening for messages from Mosquitto.
Now, execute the test client to publish a message to the topic “my_test_topic”:
Info. -t = “topic”, -m= “message”
$ mosquitto_pub -t “my_test_topic” -m “Hello World! from pub.”

If you have the terminals side-by-side, you will se that the subscriber receives the message!

Fantastic! The broker is working!
Back to Index.
Installing MQTT Python Library – Paho
Before we can get into coding, we need to install the library paho-mqtt. We can do that with the pip package manager.
Before we do that, I want to clarify something about the pip installer.
Many sites will tell you, just run this and the package will be correctly installed:
$ pip install paho-mqtt
This will indeed work but in my case, it will install the package to the Python2 directory. The package will be associated with the wrong version of python! I will explain how this is working and how we simply can avoid it.
For backward combability reasons, Raspbian comes with pyton2 and python3 pre-installed. (You should use the latest version of Python unless you really know what you are doing or don’t have any other choice.)
Open a Python3 prompt by running:
$ python3
Now, import sys and print out sys.executable:
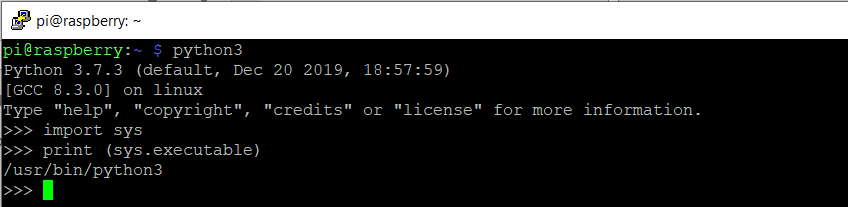
The path /usr/bin/python3 is the path to the executable file that runs python3.7.3 (latest version I have installed). Exit the prompt with exit().
Let’s examine the path!
$ cd /usr/bin
$ ls -l
This will output all content in bin directory in list form, look at the python* entries:

Info. Colours of files in Linux.
- Blue: Directory
- Green: Executable or recognized data file
- Sky Blue: Symbolic link file
- Yellow with black background: Device
- Pink: Graphic image file
- Red: Archive file
- Red with black background: Broken link
You can see that python3 defaults to executable python3.7 and just typing python defaults to python2 which defaults to executable python2.7.
Now, let’s use this information to examine the pip command:
$ pip –version
$ pip3 –version
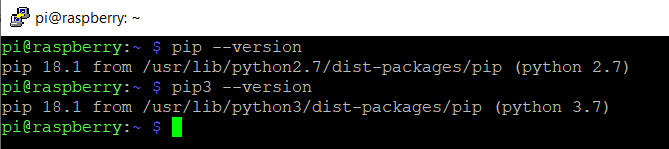
Here you can see the relationship with your installed python binaries!
The pip command will default to python2 but the command pip3 will default to python3!
Be aware of this when you follow guides on the internet, check which python version you are using and how the pip command behaves on your installation.
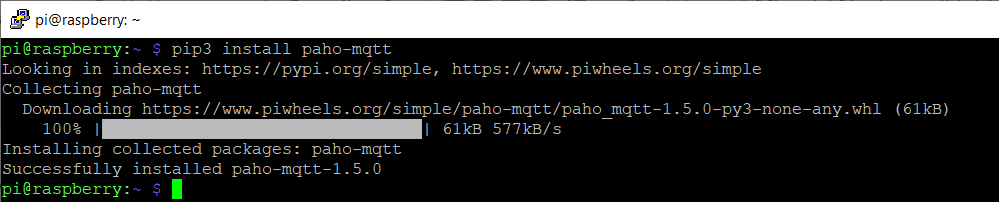
Now we can finally install the package. I am using python3, so this is the right command:
$ pip3 install paho-mqtt
Note. On some Raspbian images, pip is not preinstalled. Use this command to install it:
$ sudo apt install python3-pip
Back to Index.
Write a Test Publisher Client
Okay, let’s get down to business. Here comes my code suggestion:
Info. This code will publish a message to the “my_test_topic” topic to MQTT Mosquitto on localhost. The message will be in json format and contain: the client name, a random number, and the date-time.
Info. The code presented in this blogpost is now maintained here: https://github.com/raspberryfield/python-mqtt-examples-git.
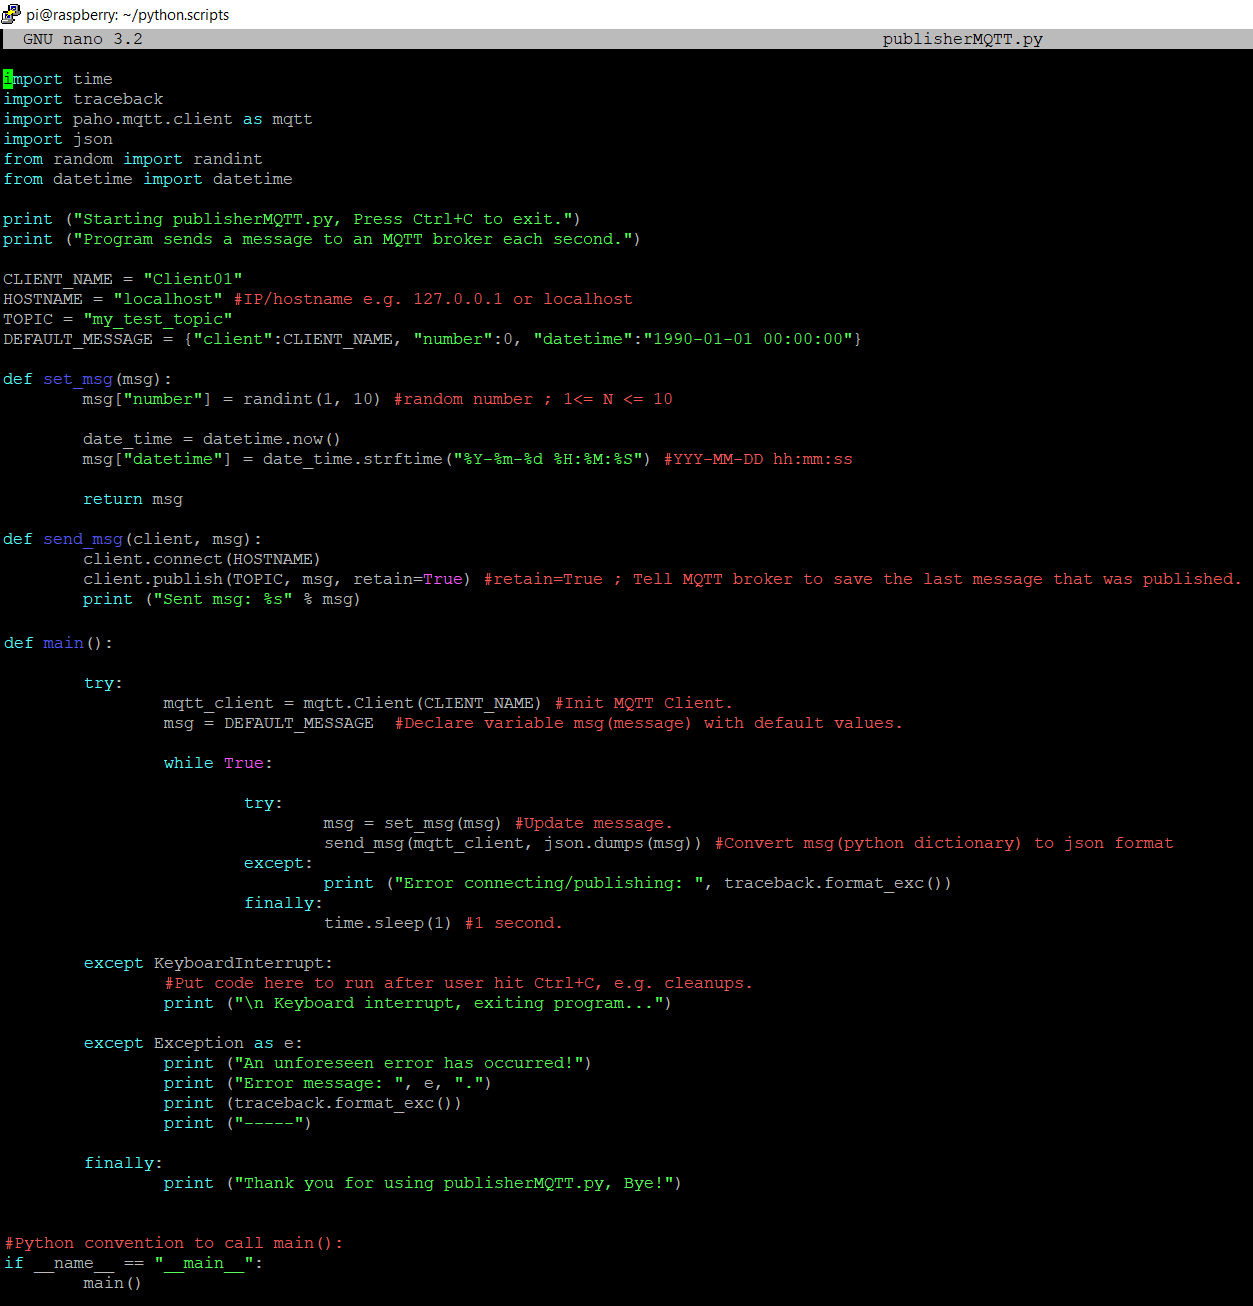
publisherMQTT.py
import time
import traceback
import paho.mqtt.client as mqtt
import json
from random import randint
from datetime import datetime

print ("Starting publisherMQTT.py, Press Ctrl+C to exit.")
print ("Program sends a message to an MQTT broker each second.")

CLIENT_NAME = "Client01"
HOSTNAME = "localhost" #IP/hostname e.g. 127.0.0.1 or localhost
TOPIC = "my_test_topic"
DEFAULT_MESSAGE = {"client":CLIENT_NAME, "number":0, "datetime":"1990-01-01 00:00:00"}

def set_msg(msg):
	msg["number"] = randint(1, 10) #random number ; 1<= N <= 10

	date_time = datetime.now()
	msg["datetime"] = date_time.strftime("%Y-%m-%d %H:%M:%S") #YYY-MM-DD hh:mm:ss

	return msg

def send_msg(client, msg):
	client.connect(HOSTNAME)
	client.publish(TOPIC, msg, retain=True) #retain=True ; Tell MQTT broker to save the last message that was published.
	print ("Sent msg: %s" % msg)

def main():

	try:
		mqtt_client = mqtt.Client(CLIENT_NAME) #Init MQTT Client.
		msg = DEFAULT_MESSAGE  #Declare variable msg(message) with default values.

		while True:

			try:
				msg = set_msg(msg) #Update message.
				send_msg(mqtt_client, json.dumps(msg)) #Convert msg(python dictionary) to json format
			except:
				print ("Error connecting/publishing: ", traceback.format_exc())
			finally:
				time.sleep(1) #1 second.

	except KeyboardInterrupt:
		#Put code here to run after user hit Ctrl+C, e.g. cleanups.
		print ("\n Keyboard interrupt, exiting program...")

	except Exception as e:
		print ("An unforeseen error has occurred!")
		print ("Error message: ", e, ".")
		print (traceback.format_exc())
		print ("-----")

	finally:
		print ("Thank you for using publisherMQTT.py, Bye!")


#Python convention to call main():
if __name__ == "__main__":
	main()
And here is the program in action:
Info. The Mosquitto test subscriber client is running in the left terminal, and publisherMQTT.py is running in the right terminal.

I think it’s working great!
Back to Index.
Write a Test Subscriber Client
Info. The code presented in this blogpost is now maintained here: https://github.com/raspberryfield/python-mqtt-examples-git.
And here is an example of a subscriber client:
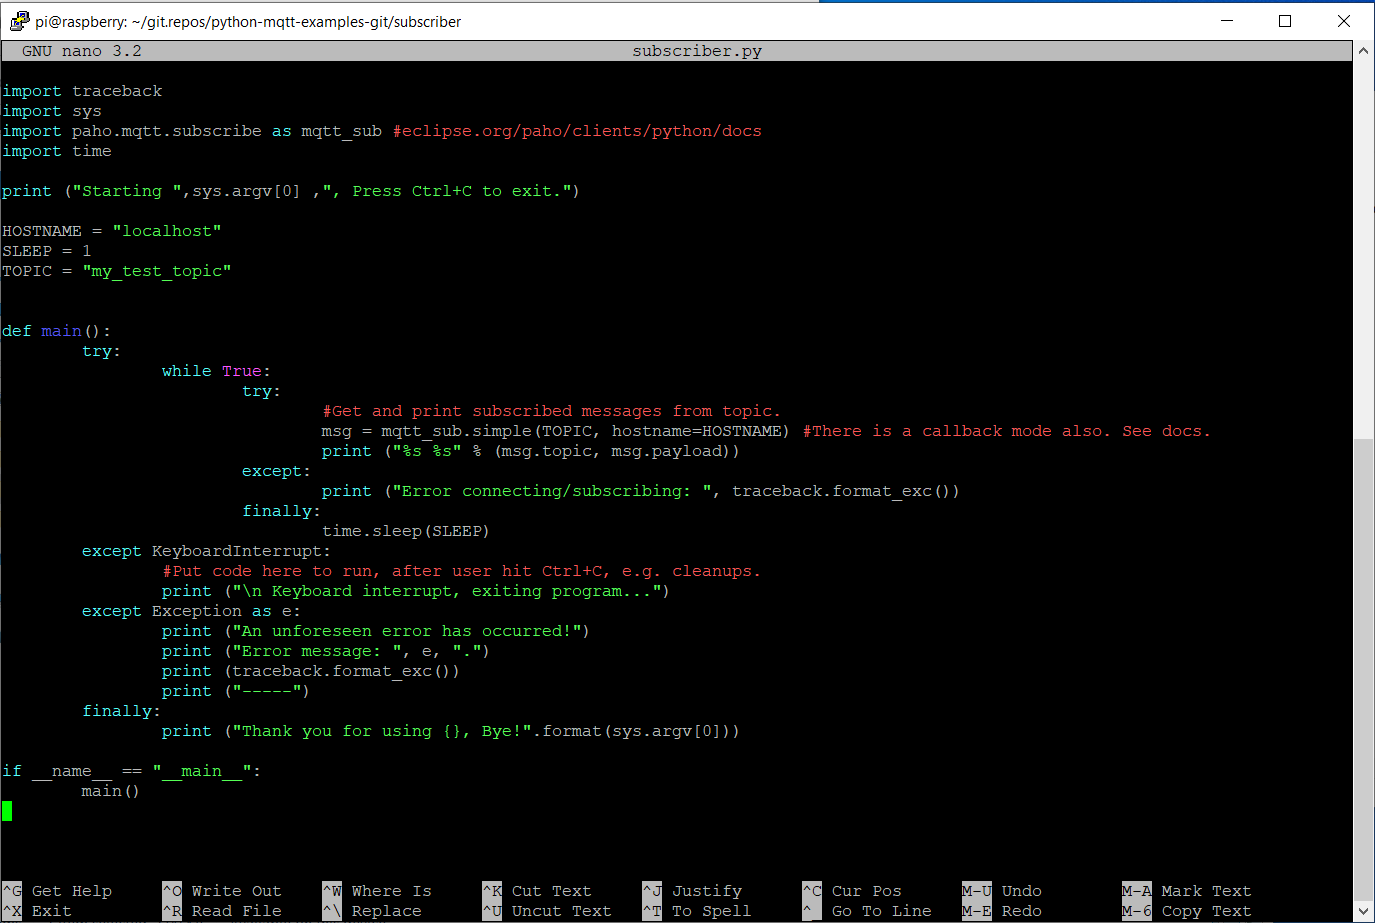
subscriber.py
import paho.mqtt.subscribe as mqtt_sub #eclipse.org/paho/clients/python/docs
import time

print ("Starting ",sys.argv[0] ,", Press Ctrl+C to exit.")

HOSTNAME = "localhost"
SLEEP = 1
TOPIC = "my_test_topic"


def main():
	try:
		while True:
			try:
				#Get and print subscribed messages from topic.
				msg = mqtt_sub.simple(TOPIC, hostname=HOSTNAME) #There is a callback mode also. See docs.
				print ("%s %s" % (msg.topic, msg.payload))
			except:
				print ("Error connecting/subscribing: ", traceback.format_exc())
			finally:
				time.sleep(SLEEP)
	except KeyboardInterrupt:
		#Put code here to run, after user hit Ctrl+C, e.g. cleanups.
		print ("\n Keyboard interrupt, exiting program...")
	except Exception as e:
		print ("An unforeseen error has occurred!")
		print ("Error message: ", e, ".")
		print (traceback.format_exc())
		print ("-----")
	finally:
		print ("Thank you for using {}, Bye!".format(sys.argv[0]))

if __name__ == "__main__":
	main()
Back to Index.
Test the Publisher Client from another Device
It is nice that we got the code working but it is not very realistic that we run this kind of software on the same device.
I want to try to run the code on another raspberry pi in my home network.
Here is my setup:
- raspberry (mosquitto broker/mosquitto server)
- strawberry (publisher client)
I will try to send messages over my home network from my pi named strawberry to the mosquitto broker installed on my pi named raspberry.
Suggestion how to set it up:
- Make sure that both Raspberry Pis are running.
- Copy the publisherMQTT.py file to your client.
- Make sure that the mosquitto service is running on your mosquitto server.
- Install the paho library on your second raspberry pi – the client/publisher.
- Make sure you can ping the server from the client.
- Change the hostname in publisherMQTT.py
Note. It is beyond the scope of this post to go into network related issues.
Info. Raspbian has a service called avahi preinstalled. Avahi service implements the mDNS protocol. This service broadcasts the hostname of the Raspberry Pi to all other devices that implement the mDNS protocol. mDNS makes life much easier when you want to communicate over the network using the hostname of each device!
You can test mDNS name resolving from your client by using the hostname to ping the server in this format:
$ ping raspberry.local

The server is responding.
Change the hostname in the script to your server name:

Info. Further improvement of the code is that the hostname could be set from the terminal.
And finally, here is the output from the test. Right terminal, strawberry (client) is running publisherMQTT.py and transmits messages to raspberry (Mosquitto server), left terminal:
Back to Index.
Conclusion
This article covered the following topics:
- What a Broker is.
- How to install Mosquitto as you message broker (pub/sub).
- How to test your broker with Mosquitto test clients.
- Provided code examples written in python for both publishing and subscribing of messages.
MQTT Mosquitto will be the backbone of the message handling between your devices and applications! It is incredibly good to know about this integration pattern – to use a message broker. It is a powerful tool in your developer’s toolkit.
Back to Index.
Resources
- Mosquitto tutorial: https://learn.sparkfun.com/tutorials/introduction-to-mqtt/all [2020-05-23]
- Paho tutorial (good one): https://mntolia.com/mqtt-python-with-paho-mqtt-client/ [2020-05-30]
- Tutorial 1. MQTT/Paho: http://www.steves-internet-guide.com/into-mqtt-python-client/ [2020-05-24]
- Tutorial 2. MQTT/Paho: http://www.steves-internet-guide.com/mqtt-retained-messages-example/ [2020-05-24]
- Linux Services commands: https://linoxide.com/linux-command/how-to-list-services-in-linux/ [2020-05-23]
- Python recommendations: https://realpython.com/python-main-function/ [2020-05-24]
- Documentation Paho: https://www.eclipse.org/paho/clients/python/docs/#simple [2020-05-26]
Back to Index.