Headless Raspberry Pi
Sometimes you want to use and be able to configure a single board computer (like the Raspberry Pi) without a monitor, keyboard, and mouse. Such a setup is called headless setup. This post will teach you how to do this.
Index
- Introduction
- Prerequisites
- Configure Wi-Fi and ssh
- Get the IP address
- Connect via ssh using PuTTY
- Change the hostname
- Share files with samba
- A Blinking LED
- Conclusion
Introduction
Depending on e.g. the project, environment, or type of Pi, you might not be able to interact with the Pi with a monitor, keyboard, and mouse. We often need to access a Pi from another computer (called headless). Follow the instructions in this post and you’ll know how to do it!
Back to Index.
Prerequisites
Read this first:
- How to install the OS Raspbian: https://www.raspberryfield.life/2020/05/12/getting-started-with-raspberry-pi-installing-raspbian/ [2020-05-21]
Back to Index.
Configure Wi-Fi and ssh
In a previous post, I showed how to install an OS on the Pi (see prerequisites). The process of formatting the SD card and writing the OS image to the SD card are always the same. However, in this headless setup, we will be using the Lite version of the OS Raspbian. This version means that you will have minimum preinstalled software and no Graphical User Interface (GUI), no desktop.
Download the Lite version here: https://www.raspberrypi.org/downloads/raspbian/ [2020-05-21]
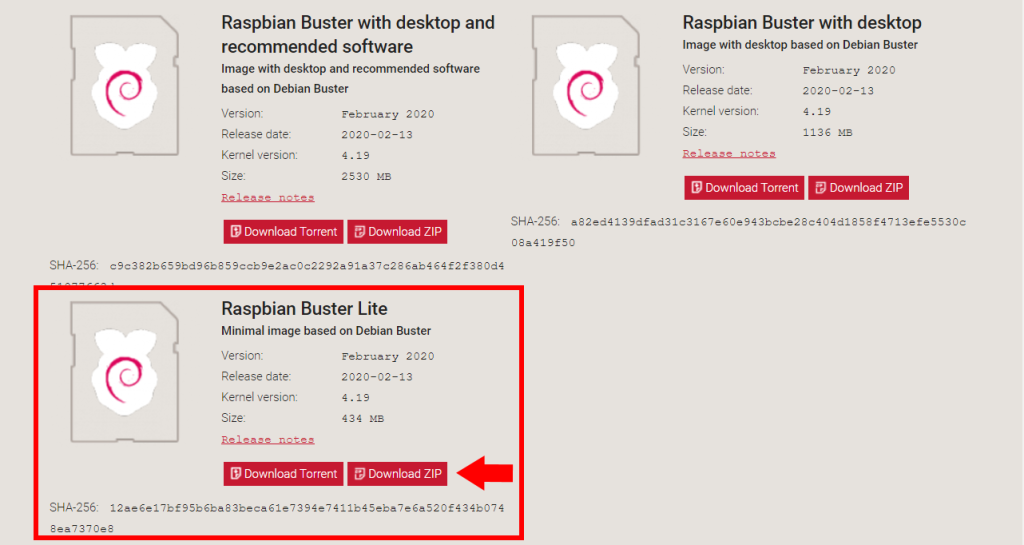
Info. The latest version of Raspbian Lite (May 2020) is called Buster. The versions of Raspbian are often named with a name and not a number.
After you downloaded it:
- Format a SD card.
- Write the downloaded image to the SD card.
Now we are ready for configure of Wi-Fi and ssh!
Configure Wi-Fi:
First, create a file locally on your computer named: wpa_supplicant.conf
In this file, put the following:
wpa_supplicant.conf
ctrl_interface=DIR=/var/run/wpa_supplicant GROUP=netdev
update_config=1
country=<Insert 2 letter ISO 3166-1 country code here>

network={
 ssid="<Name of your wireless LAN (SSID)>"
 psk="<Password for your wireless LAN>"
}
Info. See this Wikipedia page for which country code you need for your country: https://en.wikipedia.org/wiki/ISO_3166-1 [2020-05-21].
Note. When you see something like this: “<Your login name goes here!>”. That means that you should replace everything, including the tags <> with the proper configuration. Example: “<Your login in name>” becomes in my case: “Fred”.
After you have formatted the SD and written the Raspbian Lite image to it, you should see this in your file explorer. Your formatted SD card shows up like a device named boot:

This is a partition of the SD card that windows can read. Double click on boot and you can brwose some files:
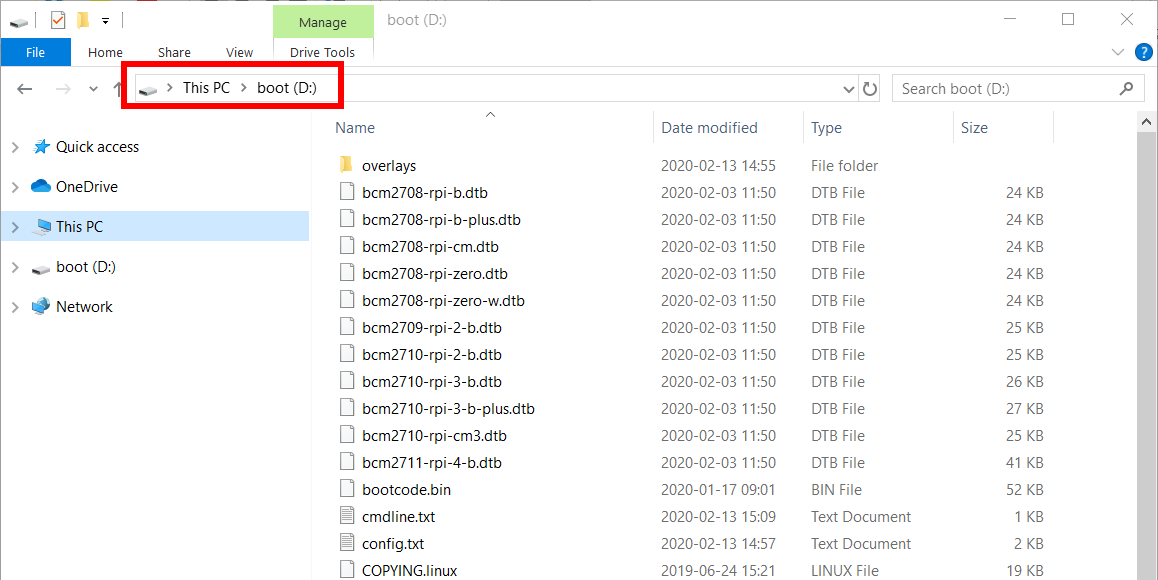
It is here you want to put your file with the Wi-Fi configurations, wpa_supplicant.conf!
Configure ssh:
To be able to access the Pi remotely from another computer, we need to activate ssh.
Info. SSH stands for Secure Shell. SSH is a service running on a Linux distro (like Raspbian). When you have ssh activated, it allows for client programs that implement the ssh protocol to remotely connect to a Linux machine.
It is simple to tell Raspbian to activate ssh. Just create a file named ssh, with no extension and no content, in the root directory of the boot partition on the SD card (the same place where you put the file wpa_supplicant.conf):
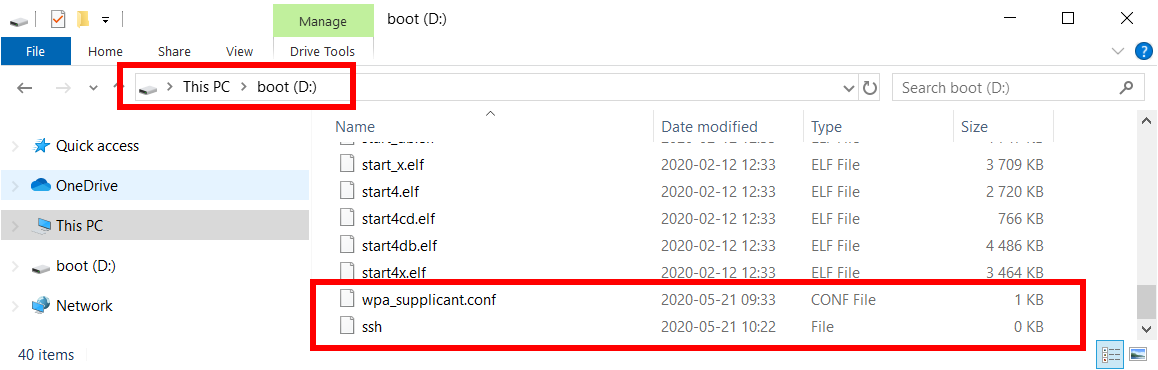
Here are the config files in the root directory of the boot partition on the SD card.
When you have created the configuration file for Wi-Fi and ssh you can start the Pi.
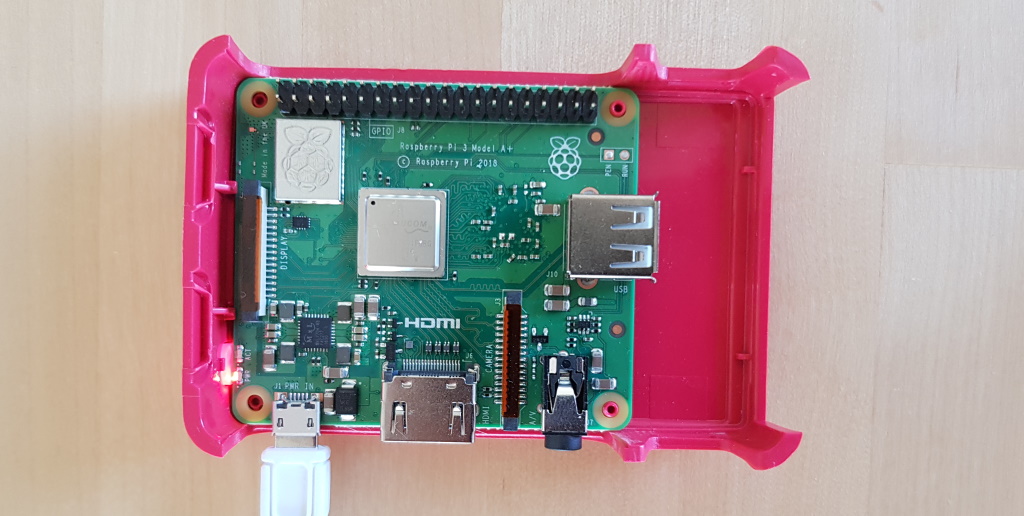
Here is my Raspberry Pi 3 Model A+ booting up for the first time with the manually added configurations:
Back to Index.
Get the IP address
To connect via ssh to the Pi, we need to know the IP address of the Pi.
Info. If you configured the wpa_supplicant.conf file correctly, the Pi will on boot automatically connect to your router. The router has a service called DHCP (Dynamic Host Configuration Protocol) running on it. The DHCP service makes sure that every device on your network is assigned a unique IP address. And this IP address can be different from every restart of your device and restart of the router. For the first time to connect, we need the IP address. (I will later in this post suggest how to connect with the hostname. But before we can do any configurations, we need to connect via IP address).
You can get the assigned IP address to your Pi via your router.
Info. The IP address is the unique number that tells you which device is which on a network.
Note. All routers have different user interfaces. Check the manual for your router on how to connect to it. If you got the router from your Internet Service Provider, there is often the site, and login credentials printed on a label under it.
Most routers implement a web interface. To login to your router, you open a web browser and type in the IP to your router, (often 192.168.0.1):
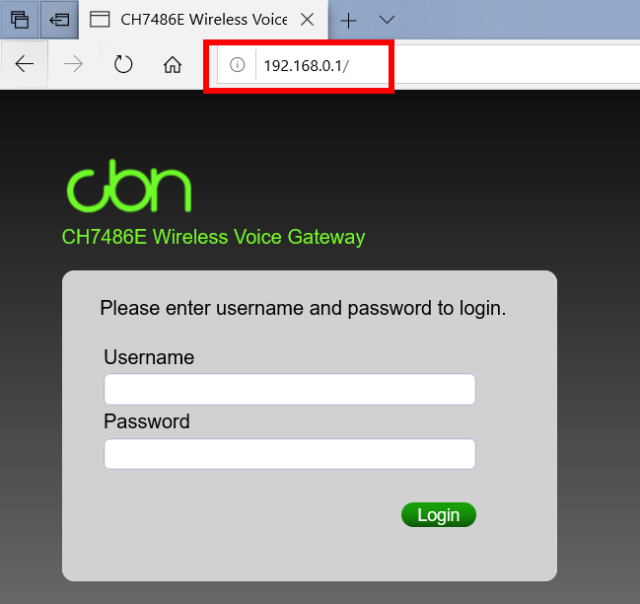
That will open the web GUI from the router’s web server. This is the interface how to manage your router.
All routers have different GUIs. However, there should be a section in your router’s web GUI where you can see a list of all the devices that are connected to your network. In that list, you should have an entry called raspberrypi. (“raspberrypi” is the default hostname of all Raspberry Pis.) Here is mine:

The number 192.168.0.9 is the IP addres (IP version 4 standard format), this is the IP we need.
Note! If you have several Raspberry Pi connected to your home network, and they all have the same default name, it will be hard to tell them apart. That is why it is a good practice to always rename the Pi’s hostname to something unique on your network. (I will later in this post show how to do this.)
Back to Index.
Connect via ssh using PuTTY
To connect to the Pi via ssh, we need a client (program) that understands ssh. A free and popular client is PuTTY for windows. You can download PuTTY here: https://www.putty.org/ [2020-05-21].
After you have downloaded and installed PuTTY, open the application. You will see this user interface:
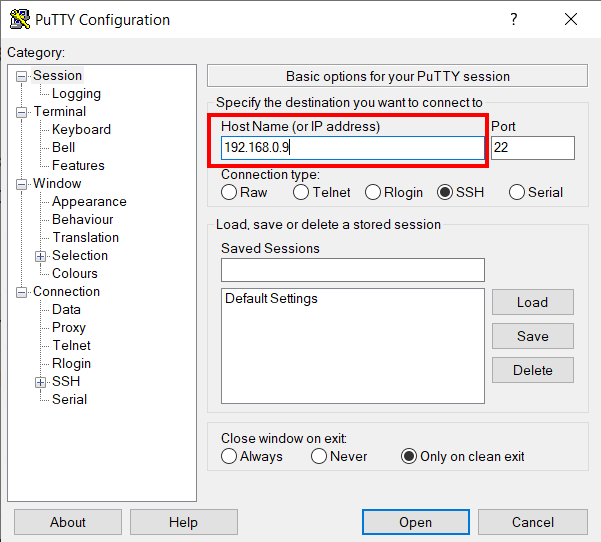
From this GUI you can open a ssh session to the Pi from your PC. Type in the IP address in the Host Name field. You can also use the hostname e.g. raspberrypi, but if you have several devices online with the same hostname, it won’t work or you can control to which pi you are going to open a session to. Having the same hostname on the network causes naming conflicts.
Open a session by clicking Open.
First time you connect to a device, you will get this warning:
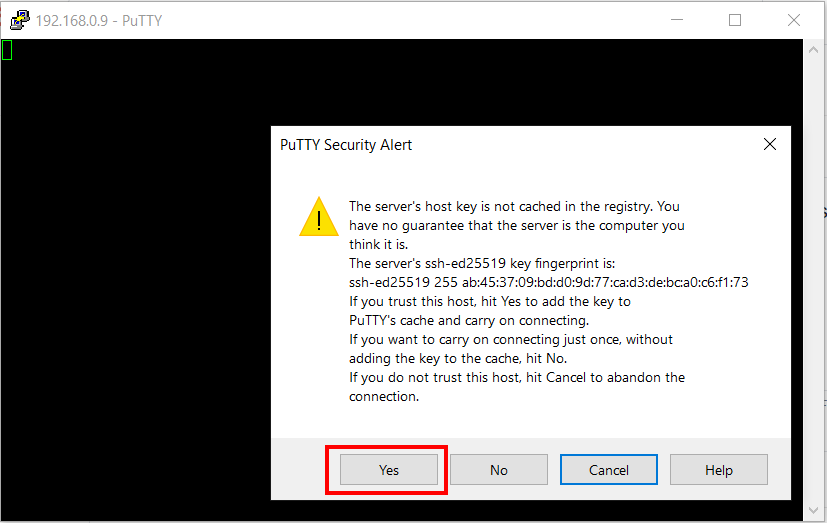
You can ignore this warning and press ‘Yes’. (In a production environment at a company, you would have other routines).
Now, an ssh session will open between your PC and the Pi. First thing is to enter the credentials:

(When you type the password, it will not display, and the cursor will not move. This is behaviour by design so no one can snatch your password by watching you typing it.)
Once logged in, you will have access to the terminal on your Pi. And you will get this message:
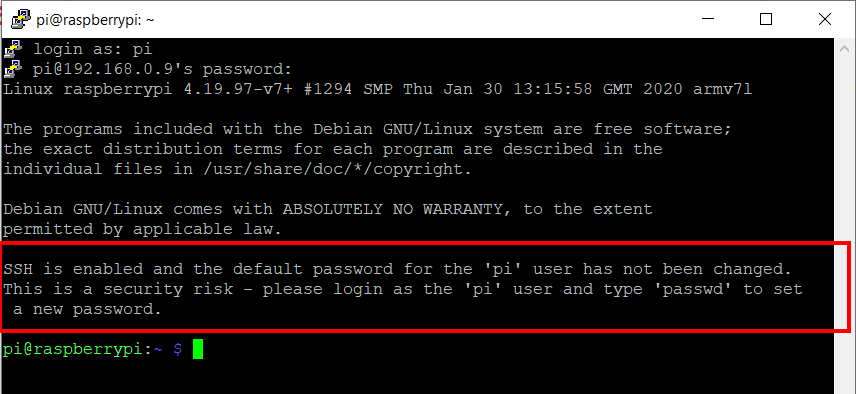
It is a warning that you are using the default user with the default password on the Pi. Follow the instructions to change it.

Good job! Now you are connected to the Pi and have changed the default password!
Back to Index.
Change the hostname
To avoid conflicts on your network that can affect your connections between applications, it is good practice to rename your Pi (host/node) before you start any development.
To accomplish this, you want to edit two files:
- /etc/hosts
- /etc/hostname
To edit the files, we will be using the built-in text editor called nano.
In the terminal (in your ssh session via PuTTY), type this command sudo nano /etc/hosts:

In this file, change the name in the red box to the hostname you want:
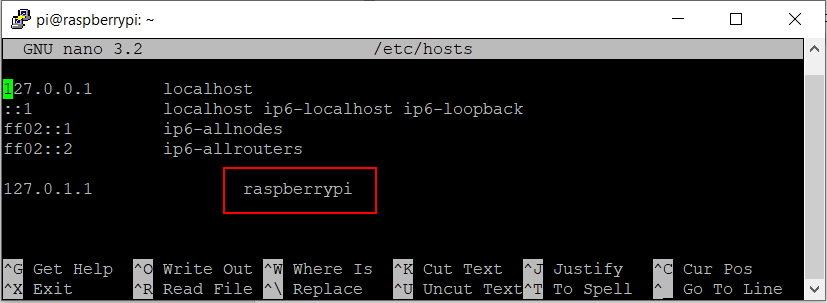
Exit the nano application by Ctrl + X .
Now edit /etc/hostname:
$ sudo nano /etc/hostnameChange this entry to your new hostname:
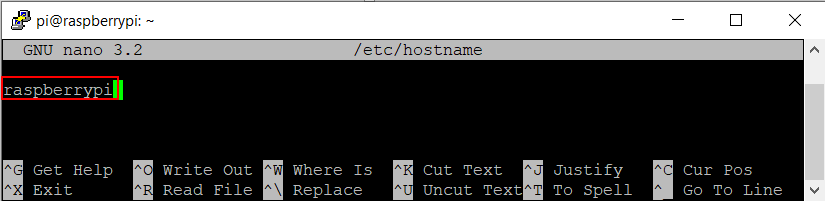
Info. I changed my old hostname from raspberrypi to strawberry. Normally in a production environment, people tend to name the hosts (or nodes as called in a network) to something about their location and purpose, like boilertemp01. I change the locations and the purpose of my Raspberry Pis all the time (depending on the experiment I am doing), so I stick to more general names that I can remember associated with the device itself.
Now, restart your Pi:

Log in to your router again and confirm that your Pi’s name is changed:

Back to Index.
Share files with samba
It is a common scenario that you want to share files between your Pi and PC. Please look at this post how to do this: https://www.raspberryfield.life/2020/05/22/samba-share-raspberry-pi/ [2020-05-22].
Back to Index.
A Blinking LED
Here is an example how you can program your Pi headless, using the GPIO pins.
Note. This example assumes that you have some knowledge about working in the terminal and basic understanding of programming. This example builds on my previous posts about programming the GPIO pins on a Raspberry Pi. Read the blog post here: https://www.raspberryfield.life/2020/05/18/raspberry-pi-getting-started-with-gpio/ [2020-05-22]
We will be using the blinkingLED2.py example from the previous post:
blinkingLED2.py
from gpiozero import LED
from time import sleep

led = LED(14) #GPIO14

while True:
	led.on()
	sleep(1)
	led.off()
	sleep(1)
This code has a dependency to the python library gpiozero. By default this library is to included in the Raspbian Lite version. We must install it.
Info. I made this before I change the hostname. That’s why you see raspberrypi as the hostname and not strawberry.
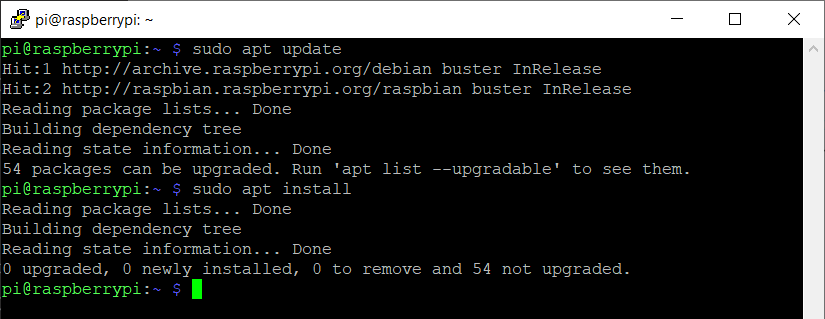
First, update and install updates of all your packages:
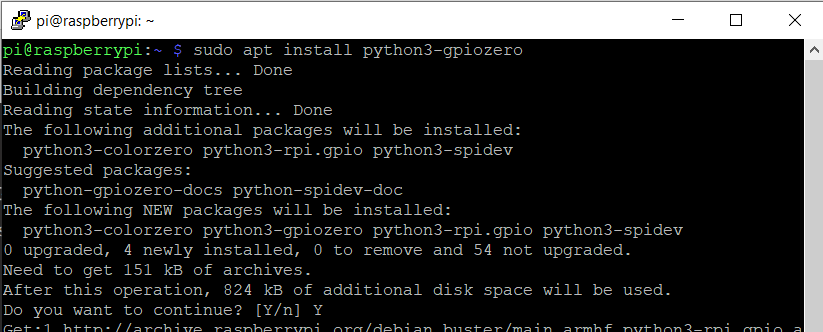
Then, install the gpiozero library and its dependencies:
Now when you have gpiozero library installed, you can use the pinout command to find out the right pin number you use in the code.
$ pinoutUse the information from pinout and connect the dupont jumping wires accordingly to the code.
Here I have created a directory for python scripts and moved the python file blinkingLED2.py from the shared directory to the script directory. (The python file, I pasted it to the share from my PC):

Run the program just as in the previous post:
$ python3 blinkingLED2.pyAnd now we got the LED blinking with this set up also!
Back to Index.
Conclusion
In this post we covered a lot of the basics!
- Setting up Raspberry Pi headless
- Using ssh and PuTTY
- Change the default user password
- Change the hostname
- Testing a simple python program
Good job if you read this far!
Back to Index.